Foam panels are a common go-to for sound treatment — but they aren’t always practical, affordable, or visually appealing. The good news? You can significantly improve your room’s acoustics using something much more versatile: curtains.
Whether you’re working from home, podcasting, teaching online, or simply trying to quiet a noisy space, this guide will show you how to use curtains to absorb echo and manage sound — without sticking foam tiles all over your walls.
🎯 Why Curtains Instead of Foam?
Curtains are:
✅ Less permanent than glued panels
✅ More stylish and space-friendly
✅ Effective across large wall and window surfaces
✅ Easier to clean, remove, or replace
While foam panels treat high frequencies and require careful placement, curtains offer broad, flexible sound absorption, especially when made from acoustic-grade materials.
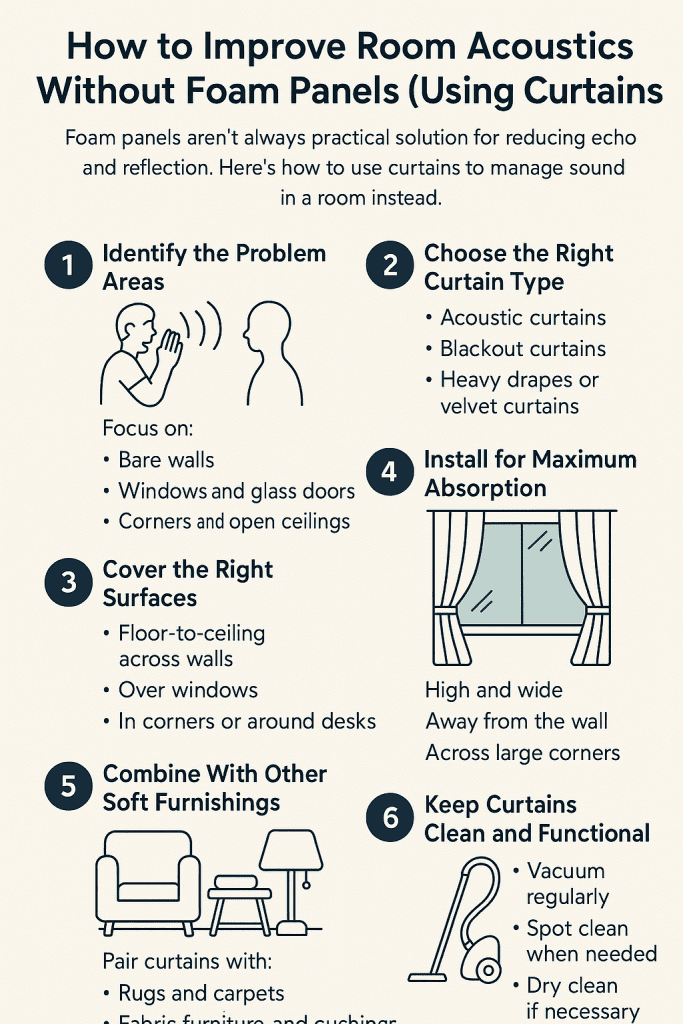
🧵 Step 1: Identify the Problem Areas
Start by clapping your hands in the room. If you hear sharp echo or “flutter,” your space has sound reflections bouncing off hard surfaces.
Focus on:
Bare walls
Windows and glass doors
Corners and open ceilings
Large, empty areas with minimal furniture
🔇 Step 2: Choose the Right Curtain Type
For meaningful sound improvement, regular lightweight curtains won’t cut it. You’ll need:
Acoustic Curtains
Thicker, denser, and layered to absorb mid-to-high frequencies. Ideal for reducing room echo and improving voice clarity.
Blackout Curtains
Not just for light control — these often feature thermal lining that helps with sound dampening.
Heavy Drapes or Velvet Curtains
If acoustic-specific curtains aren’t an option, opt for lined velvet or stage-style curtains. The heavier the material, the better the sound absorption.
📏 Step 3: Cover the Right Surfaces
To reduce echo, you’ll want to break up flat, reflective surfaces.
Curtains work well when installed:
Floor-to-ceiling across walls
Over windows (bonus: it also blocks noise from outside)
In corners or around desks to create recording “zones”
Behind or around speakers and microphones
Pro tip: The more surface area covered, the greater the acoustic impact.
🔧 Step 4: Install for Maximum Absorption
Mount your curtains:
As high and wide as possible — especially over windows or walls
Away from the wall by 2–4 inches if possible (air gaps increase effectiveness)
Using ceiling-mounted tracks for full-wall or wrap-around treatment
Across large corners or alcoves to break up reverb-heavy zones
🧠 Step 5: Combine With Other Soft Furnishings
Curtains alone can make a big difference — but pairing them with other soft materials amplifies the effect. Try:
Rugs and carpets
Fabric-covered furniture
Cushions or wall hangings
Bookshelves (especially uneven ones)
Together, these elements help create a more acoustically balanced space — especially in home offices, creative studios, or small classrooms.
🧼 Step 6: Keep Curtains Clean and Functional
Maintain your acoustic setup by:
Vacuuming curtains weekly (especially thicker fabrics)
Spot cleaning any visible marks
Dry cleaning every 6–12 months (depending on fabric type)
Dust buildup can reduce sound absorption over time, so keeping your curtains clean matters for performance too.
✅ Final Thoughts
You don’t need acoustic foam tiles to improve sound quality in your room. With the right curtains — properly chosen, measured, and installed — you can:
Reduce echo and reverb
Improve voice recordings and speech clarity
Soften a room for teaching, video calls, or music practice
Enhance both function and style
📞 Need Help Choosing the Right Curtains?
Studio Curtains designs and installs acoustic, blackout, and decorative curtains for clients across the UK. Whether you’re upgrading your home studio, classroom, or creative workspace, we’ll help you get better sound — no foam needed.
👉 Contact us or call [0800 772 0367] for a free consultation.